45 Tips to Work Smarter in Google Docs, Sheets, Drive and Gmail
 By busayo.longe
| Last updated:
Jul 27
|
19 min read
By busayo.longe
| Last updated:
Jul 27
|
19 min read
Share
Google Docs is perhaps one of the world’s best data-driven ingenious products which provide solutions to data security, team collaboration, integration and an easier approach to document storage amongst others. Vice-grip or not, Google sure has created numerous products and services to help everyone, whether it’s for personal or business use.
Each Google products; Drive, Keep, Docs, Sheets, Photos, Calendar, Gmail, etc – has a streamlined interface fitted with features that boast of high-end intelligence and security (it’s Google, you shouldn’t expect less).
Seeing that a number of Formplus users are Google Drive-dependent, thanks to our native Sheets integration feature, we decided to compile a list of hacks and tricks to boost your productivity when using google docs – whether it’s at work, school or even in your personal life.
This list will provide insights to effective usage of the four major G-Suite products. Here are the top 45 tricks to help you work smarter on Google Docs, Google Sheets, Google Drive and Gmail;
You might not want to consider Google Docs because of your familiarity with Microsoft Office tools (MSWord and Excel). However, it’s safe to say that Google Docs performs most of the functionality of Word and even more features with the aid of the internet.
Google Docs can be used on any internet browser. Since it’s a Google product, it’s best to use chrome browser or download Chrome Extensions for easier access to all documents online.
Let’s say your colleague is reviewing a portion of a long document you are working on and you’ll like to see their cursor, corrections or comments in real time, then you have every reason to use google docs rather than exchanging emails for every edit or corrections.
Simply click the “share” avatar in the top right corner of the page to give edit, comment or view access to your team members with google docs.

You don’t have to use “Control + F” (Windows) or “Command + F” (Mac) or do a long scroll to find what portion the person is working on currently.
Take advantage of the Google Docs templates available on the home screen to create newsletters, blog posts, resumes, contractor agreements, business letters and more documents with formatted content from the available templates.

You can use any of these templates or start out with a blank page and handle all your own formatting.
Do you see the Add-ons menu? The one you have probably ignored more times than you care to admit. Yes, that one. Do you know there is so much you can achieve with Google Docs Add-ons?
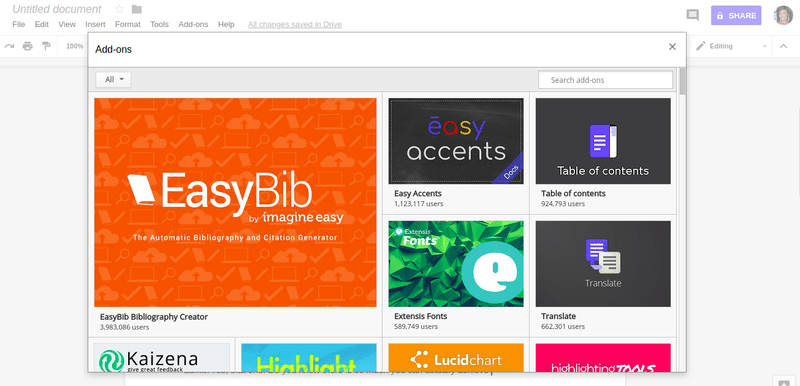
Explore the wide variety of add-on tools available for tasks like document analysis and fine-tuning. Add-on like screenplay formatter, a rhyme finder, a document to form converter, etc. are essential to your day-to-day activities
There’s even an add-on named revision history analytics, and with it, you can see the proportion of collaborative efforts each user has contributed to a Google Doc. It automatically creates charts and summaries in order to visually understand all users’ interactions (or lack thereof) made on the document.
Still not satisfied? Check out the best google docs add-on you can always rely on
If you have a special phrase or string that needs to be typed repeatedly, create your own shorthand text to help deal with it. From the “Tools” menu, click “Preferences” and type in shorthand in a new “replace” field and then add the full-length text to the adjacent field.
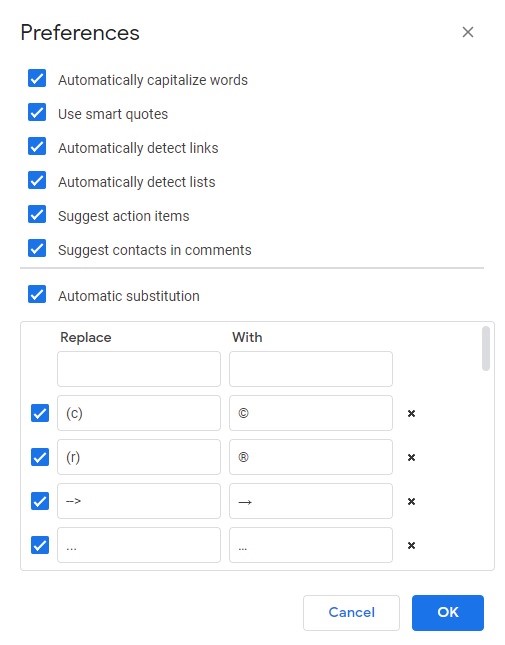
You can do other things like disabling “Automatically capitalize words”, or “suggest contacts in comments” and any other shortcuts.
Rather than printing out docs before signing them physically, E-signatures save you the multi-step process that may be required when filling multiple documents. They also save you time – that would have been spent on printing out docs, physically signing them, scanning them back to the PC and then emailing them out.
To create one, go to the ‘Insert’ menu, select “Drawing”, and then the “Scribble” option. From there you can draw your signature.

Google Docs has speech typing to help users write and edit text with simple voice commands. For example, users can add punctuation by saying “comma,” “period,” or highlight a word by saying “highlight” and “delete” to remove a word.

To use this feature, go to “tools” then “voice typing”. A small window with a microphone icon will appear and when you asked to allow access to your microphone, click “allow.” The microphone will turn red once it’s working and the words you’re speaking will appear on the page.
Rather than switch between tabs you can hyperlink text right from Google Docs using the Search function as shown below.

Simply select the preferred text and click on the Hyperlink icon on the taskbar; Google will do a quick search for relevant links, but you can use “find more” to refine your search.
If you have a preferred URL, paste it in and click “Apply” when you’re done.
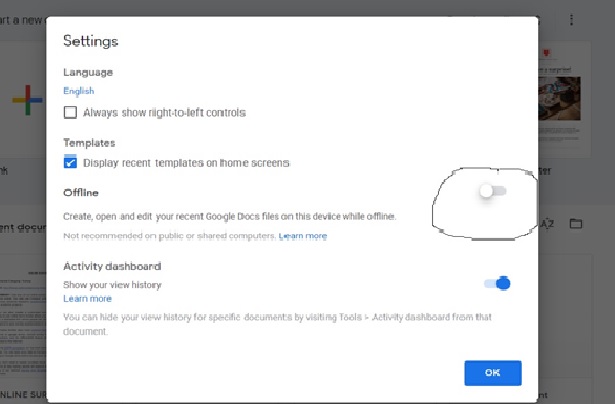
Google Docs offers offline document creation and editing for all users. Once you” Enable offline syncing”, you will be able to download files in MSWord or Excel sheets to your devices and edit them offline. By the time internet connection is re-established, offline Docs will automatically sync, and the files will be updated.
On the Docs home page, click the left menu option, which is displayed as three horizontal lines, then select settings and enable offline syncing.
This feature makes it easy to navigate through a very lengthy document, allowing you to skip ahead, or fall back, rather than scrolling through the document and guessing where you left off. Just like a table of contents, the outline tool sticks around the left-hand panel of the document as you scroll through.
To use document outline: Select the text you want to make a heading and on the toolbar styles menu, click Normal text. From that menu, click a heading style. This heading will then be added to the outline. You can choose to show/hide the outline like this: Select View > Show Document Outline. The outline tool will appear in the left-hand panel of your Google

The Google Keep and Docs integration makes it easy to keep notes for a document you are working on.
All you need to do is record your notes, lists and drawings in Google Keep on Android, IOS, Chrome or the web. Then while on Google Docs, access the Keep notepad via the Tools menu. Your Google Keep notes will appear in a side panel within Docs.

Here are a few tips to working with Google Keep directly in Docs:
For any enterprise whose aim is global service and reach, you will be pleased to know that Google Docs also supports communication in multiple languages.
![]()
To translate a document into another language within Google Docs, go to the “Tools” tab and then select “Translate document”. Alternatively, you can select the text, copy it, then paste it into the Google Translate service on the web (translate.google.com) or in the mobile app.
Before now, it was believed Google Sheets did not have the functionality that Microsoft Excel provided but, as at 2018, that paradigm has shifted. With Google Sheets, you can collaborate with non-Google users without having to convert to Sheets. Amazing!
As a Form builder with Google Sheets integration, we understand how easy it is to collect and manage data with Sheets, and Forms. We’ve even talked about it previously – “How you can get more from Google Sheets add-ons” and “How to work better with Google Sheets”.
Here are some more top tips to help you work better in Google Sheets;
Like most software these days, Google Sheets has many keyboard shortcuts that can make you more efficient.
Now you don’t need to cram all of them, just keep note of the basics and call up a list of all possible keyboard shortcuts for Google Sheets. Use cmd + / (⌘ + / ) on a Mac to, or ctrl + / on Windows to see keyboard shortcuts on google sheets
It’s not all that easy to insert an image into Google Sheets – if you click “Insert -> Image”, an image appears over the top of your spreadsheet rather than neatly placed in a cell.
To insert an image into a cell, select the desired cell, then type =image (“URL of the image you want to insert”). The image will retain its default aspect ratio while adapting to the cell size, but here are some formatting options so you can get the image/cell the size you want:
This trick is especially useful when you are collaborating with others from different parts of the world. Use the “DETECTLANGUAGE( )” formula to identify languages. The formula will return a two letter language code and you can find the full list of language codes here.
You can also translate text from one language to another with the “GOOGLETRANSLATE( )” formula. This formula has three parts – text to translate, the current language of the text, and the language you want to translate into.
Before now, we had to use an add-on to insert a Google Sheets chart to Google Docs but now you can do this without one.
Navigate to Insert > Chart in the document you are working on in Docs; select the “From Sheets” option. With this, you will be able to view of all your Google Sheets (personal, and shared).
Note: An error message will pop up if you select a Sheet that doesn’t contain a chart.
If you make changes to the data used in creating the chart, it will update automatically in Google Docs, so there’s no need to manually maintain two charts.
You can create a custom Google Map with data from Sheets. This is very useful for tracking customer location and also spotting areas of convergence relating to your business.

Go to “Add-ons” and download the ‘Mapping Sheets’ add-on, enter address data into the Sheet (If you’re doing this with a Formplus form, it is even easier). Click ‘add-ons’ then ‘Mapping Sheets’ and finally ‘start mapping’.
If you are collecting a large amount of data with Sheets, make use of the “Conditional Formatting” feature to highlight bits of data.
Apply a Color Scale to your conditional formatting to emulate a heatmap; set different shades of the same colour or include your own custom colour scale to highlight high and low values. This will make it easier to identify which data to focus on.
To create data heat map on google sheets, input and select data in Google Sheets, go to the “Format” tab and click “conditional formatting”. A side-panel will open and if you select “Colour Scale” you’ll be able to pick a colour for the “minpoint”, “midpoint” and “maxpoint”. Click done when you finish adding rules.
Your business, no matter the size or function, could find many uses for QR codes. They are very useful in offering product details, contact details, event details etc. They basically provide more information. Google Sheets lets you generate QR codes with any input you like.
You can generate QR codes with this formula;
=image(“https://chart.googleapis.com/chart?chs=150×150&cht=qr&chl=”&A2).
A2 is the cell with the URL or text you want to use to create your QR code.
No more going to meetings and presentations without double checking that spreadsheet. Google Sheets can spell-check entire sheets or individual cells for errors.

To use spell-check on sheets, highlight the chosen area and go to “Tools”, from there click “Spelling” and it will open a panel with a familiar spell check interface. If you want to spell check the entire sheet, don’t highlight anything.
Now you can set custom page breaks in a Google sheets spreadsheet. Hit (CTRL + P) or (CMD + P) to print and on the Print settings page, click the blue text that says “Set custom page breaks.”

A preview pops up to show you how Google Sheets thinks your pages should be broken. Hover your mouse to adjust the default page breaks; when you’re done confirm the page breaks and then print it the way you want.
Google recently introduced the ability to add checkboxes to cells option to Sheets. For those who need to check multiple checkboxes at once, you’ll discover that it is time-consuming and counterproductive.
Rather than click until all the boxes are checked, you can check multiple checkboxes with the space bar. Highlight your preferred range of checkboxes and press the spacebar. All checkboxes within that range will be checked as true.

Let’s say you need to format new data imports or build the same chart across multiple sheets of data. Rather than manually repeat the same steps over a couple of hours, the Google Sheets macro recorder lets you record those actions and play them back on command.
From the Tools menu, select Macros > Record Macros. Perform the function(s) you want to record. The Record Macro tool then records each click you make (you can practice or write down the steps before you start recording). Click Save when you’re done, name the new macro, and click Save again. Sheets will then add the new macro as an option on the Record macro menu.
You can also customize how your spreadsheet appears when you print it. This means you can print a spreadsheet, single sheets, or specific cells, on the exact size of paper you prefer.

To change orientation on Google Sheets, navigate to “Orientation” on the print settings page and choose either Landscape or Portrait. Under “Paper size,” choose the size of paper you want to print on. If you would prefer to add custom paper size, choose custom size and enter a height and width.
We’ve previously shared some tips and hacks on – “How you can collaborate better in Google Drive and Dropbox” and also “How you can manage files better in Drive”. All the points are still valid and you should totally check those articles out so you can work smarter.
Let’s say you are on a web page and you need to save documents, images, audio, videos, and more. It’s typical to download the file then upload to Drive but that is quite stressful.

Rather than download to your computer before uploading to Google Drive, use the “Save to Google Drive” Chrome Extension to save stuff directly to a specific Google Drive folder. It’s super handy and helps to keep your computer clutter free.
There is no need to retype text from PDFs or images you need to copy. Google Drive has an option to open them with Google Docs with an automatic optical character recognition.

Within a few seconds of doing this, you will get a document with both the original file and the text from it ready to format and use wherever you need it.
It is possible to comment directly on other file types without converting them into Docs, Sheets or Slides. All of your Microsoft Office files, PDFs and images can be worked without necessarily converting them.
For instance, if you are on an external team where everyone is working on multiple file formats, you can comment on those files in Drive the way you’re used to in Google Docs.
Go to the Drive preview pane, comment on files, assign tasks, or mention co-workers and the people you work with can do the same, even if they’re not using G Suite. Once a mentioned person opens a file on her Windows laptop using MS Word, they will be able to see your comment in the file and reply directly from MS Word.
The activity panel shows when last a document was edited. While in Google Drive, click “I” to access the info pane icon in the toolbar. You can also press “I” on your keyboard to open the side panel.

Click on “Activity at the top to see a record of the last person to edit a document or the change that was to the document and when it was done. This can be helpful when collaborating with others.
Typically, Google Apps – Drive, Docs, Gmail – and the data they collect are stored in the cloud. That’s why you need to have internet access to be able to use them.

One way to circumvent this is to setup offline mode in the Settings section of Google Drive;
There is the tendency to start searching for files once you sign in to drive.google.com but there’s no need to do that every time. Especially if it’s for a file you recently worked on.
Make a habit of clicking on Recent once you sign in. This will increase your productivity as you will spend less time searching for files you could have viewed at a glance.
As with most Google apps, Google Drive has keyboard shortcuts and adopting their use will save you a lot of time and clicks.

Google drive shortcuts can be accessed by clicking the “Ctrl” and “/” keys on a Windows computer (any browser) or “Cmd” and “/” on a Mac computer.
Just press “V” to switch between grid and list view on Google drive. If you prefer to view items in Google Drive at a glance, the ‘V’ key can be used to toggle from grid view to the list view. Now, if you prefer to preview items before selection, the grid view will work well for you and you can also use the ‘V’ key to switch things.
Quick tip: click “Q” to adjust the spacing while viewing items as lists.
Formplus users can create a new form in Google Drive. On the Left Navigation bar, click the “New” button and select “More” from the drop-down that appears.

Once you click “Form+” on the second drop down, you will be redirected to the first step of the form builder where you can create a form from scratch. It is in the builder that you can; drag and drop fields, add file upload fields, set file validation, create multi-page forms among other things.
Once you are done building the form, you can go on to customize it the “Customize” section as well as set up email notifications and add logic to forms.
If you don’t have a Formplus account, you would need to sign up to create forms from your Google Drive account. Once you sign up, you can subsequently create forms from Google Drive.
Earlier in the year, Google released the first major Gmail redesign in years and with it came a number of many features. It might seem a little much at first glance, but with a few lessons, you should be ready to maximize the new Gmail’s potentials.
In the new Gmail, you can work offline and then sync your account as soon as an internet connection becomes available.

Once you’re offline, you’ll be able to write emails, archive or delete stuff offline and then choose to download and keep this data offline data on your computer even when/if you log out.
Email Snooze is a genuine time-waster rather than let messages linger and pile up in your inbox, use the snooze function to deal with everything as it comes in.
Time yourself, emails that don’t require a response or action from you, archive it immediately; emails that would take less than 1 minute response time, make an effort to respond immediately; and emails that would require some response or action and you can’t do it immediately, snooze it to a day and time when you will be able to handle it.
.

Snoozing an email makes it vanish from your inbox and then reappear at a later date and time, thus decluttering and organizing your inbox. You can also snooze multiple messages at the same time.
From your inbox, click the boxes to the left of any messages you want to include, then click the clock-shaped icon in the horizontal row of icons that appears at the top of the screen and select the day and time you want.
The Nudging feature is another tool that could help you work smarter. Google uses proactive AI tools to help you manage your inbox by suggesting or “nudging” you to respond to an email that’s been sitting in your inbox for a few days.
It is displayed in bold text to catch your eye and give you a chance to respond to or clear emails you may have ignored.
The new Gmail lets you send confidential messages; by allowing you to recall messages after they have been sent and setting an expiry date/time for messages. It works by sending the recipient a link to the actual content, not the email itself. You should note that the recipient could circumvent this process by capturing and saving a screenshot.
To enable this, when composing a message, look out for the timed padlock icon to customize your options.
Have you ever sent out an email mistakenly and you were worried that the recipient might forward or download it? You can enable the feature that allows you to prevent others from forwarding, copying, downloading, or printing your message.
Gmail also lets you protect sensitive messages with a two-factor authentication code — delivered via text to a specified number — to make sure only the intended recipient is able to open it.
Want to make your Gmail darker? You can actually switch it up in your settings.
Click the gear icon in the upper-right corner and select “Themes.” In there, you’ll find colorful options to spice up your inbox along with some muted options, like plain dark, high-contrast, and the soothing lavender.

You can also select a photo to be used as a theme when you click “My Photos” at the bottom-left corner.
Use Gmail Smart Sidebar
The right-side panel in the new Gmail interface is so versatile; apart from Calendar, Keep, and Tasks. When you click the “+” (plus) sign beneath the apps’ icons, you can add inbox-based services like as Trello, Wrike, and QuickBooks.

Google understands that Gmail is their most popular app for majority of its users, it is quite indispensable. With that thought in mind, they added some of G Suite apps into Gmail.
The side panel on the right of the new Gmail lets you pull up Google Calendar, Google Keep, or Google Tasks right in your inbox; you can manage information from each of those apps without opening or switching tabs.
When you click on any of the colorful app icons, a panel opens up letting you quickly create or edit Calendar invites, save ideas and notes in Keep, or manage to-do items in Tasks without having to leave Gmail. Those cons will then pop up beneath emails in your inbox as well any time an event, task, etc. are included in a message.
There are a variety of features in Gmail that make it even easier to deal with:


Connect to Formplus, Get Started Now - It's Free!


You may also like:
In this post, we’ll be looking at how you can use Google Scholar for your research, tips for using it along with its scope and limitations.
Customer insight helps businesses to know their customers better and build great products for them. Continue reading to learn how to...
Review of the best online form builders for data collection used to create HTML web forms with database without Coding experience. 1....
An overview of the best free cloud storage and file sharing sites for android, iphone, mac and windows devices. Degoo offers 100GB free...